iStealer Tutorial

Before we start, I just wanted to say this, This is tutorial for people which have no knowledge on configuring a iStealer server! If you have no knowledge on how to configure a iStealer server please read on!!
Also before we start we need to sign up for a free FTP service, I currently usehttp://www.drivehq.comso use that one, sign up and now lets start!
Step 1 ( Obtaining iStealer ):
Go to the following link:
*Note: This file was uploaded by me, it is safe, If you don't believe me nor want to download it search for it on google. I have been using this for a while so I consider it safe.
Download Link:
This application WILL be detected by your anti-virus. Of course online scanners detect it as infected.. it's a stealer you know..if you still believe this to be infected by me please do not download!
Step 2: (Extracting)
Right Click and extract "iStealer 3.0"
Once extracted there should be two files. One folder called "Icon Pack" and one application called "iStealer".
Double Click on "iStealer". There should now be a menu of options.
IF YOU GET ERROR MISSING COMDLG32.OCX
You can download the missing OCX here:
Once you've downloaded the missing OCX extract it into WINDOWS>SYSTEM32
Step 3: (Creating your password stealer server)
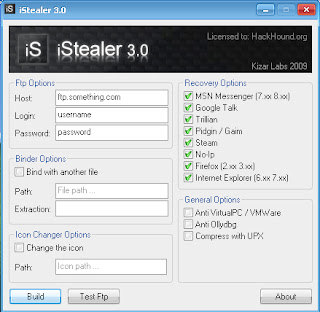
Okay once iStealer is up there should be a menu with different options.
Where it says host copy and paste this "ftp.drivehq.com" without quotes.
Where is says username enter your drivehq.com username.
Where is says password enter your drivehq.com password.
Okay Once they are all done you can decide whether you want to bind your server(password stealer)
with another application, song, document, picture etc! Just click "bind with another file" and choose what file you want
to bind your server with.
Once you have done that you can decide whether or not you want to change the icon. (If you skip this
step there will be just a default icon). Just click "Change icon then go to the folder where you extracted
iStealer, then open up icon pack then choose one of the icons there.
Once you have choosen your icon make sure ALL boxes are ticked in the "Recovery Options".
Then go down to general settings and tick " Anti virtualPC / VMWare " (This will prevent the server from running on Virtual PC's)
Once you have done that click " Build " and your done!
Step 4: Spreading/Infecting people with your server
This involves some skill, patience and well creativity.
If you want to infect a small amount of peope like a friend, ex-girlfriend etc. Just bind the server with a legitiment file some examples are: A document, song (Be Creative). Use "ShockLabs File Binder" to bind the two files together, then ZIP the server and send it via MSN Messenger.
Before we move on I'd suggest we make our server FUD meaning that the iStealer server is completely un-detected by all Anti-Virus engines this can be done by finidng a FUD Crypter, search around on the forums Im sure you will be able to find a free one. But you may have to invest a small amount of money on one if you cannot find any.
If you want to infect a majority of people I would suggest using torrents. Create a new torrent claim it to be some keygen, crack or whatever and seed! Upload your torrent to torrent sites like PirateBay and Mininova.
Also youtube is another method. Upload a fake video, and get people to download your server.
There are many other methods, Just be creative!
iStealer Tutorial


0 comments:
Post a Comment